
In the first post on WEM –> http://msandbu.org/introduction-to-citrix-workspace-enviroment-manager-part-1/ I decribed the setup process. In this blogpost I will focus more on configuring the policies and deploying them to a set of users and agents based upon filters.
The setup in WEM is split into a couple of pieces, some of the settings can be applied to a user based upon different filters, some settings a of a global level and cannot be defined to a users or group. So let’s start with the first thing which is an Actions.

here we can define most of the properities which are defined in GPP. Printers, Applications, etc and so on. So for instance we can specify map network drive

So we can speficy the regular settings here and we can also under options speficy more options like reconnect, self-healing and such as we have in GPP. Now next we have filters, which helps us sort out how and who should get actions applied to them. Now there are bunch of different options here to choose from.

So we can have one or multiple filters in a rule. So for instance we can have actions applied on a user based upon XenDesktop farm name, where the client is coming from and time of day for instance. When you have created the filters we need to create a rule and bind the filters to it. So go into Filters –> Rules –> Add

So there specify the filters and click OK. So now that we have a couple of actions specified and an filter we can assign the actions based upon the filter to a set of users.
So go into Assigment –> Configured Users and search for a particular user –> and from there just double click on which action we want to assign to the users. When we bind an action we have the option to add it based upon a filter, for instnace if the users are connecting externally we do not want them to have printers mapped up from the office for instance
Showing assigned actions to a user

Assigning action with filter

So now that we have applied some actions, we can also specify some other settings like Resource Optimization and more Advanced features. So let’s start with Memory Optimization. For instance, Working Set Optimization which defines that when an application becomes idle for a certain amount of time it is forced to release excess memory until they are no longer idle.

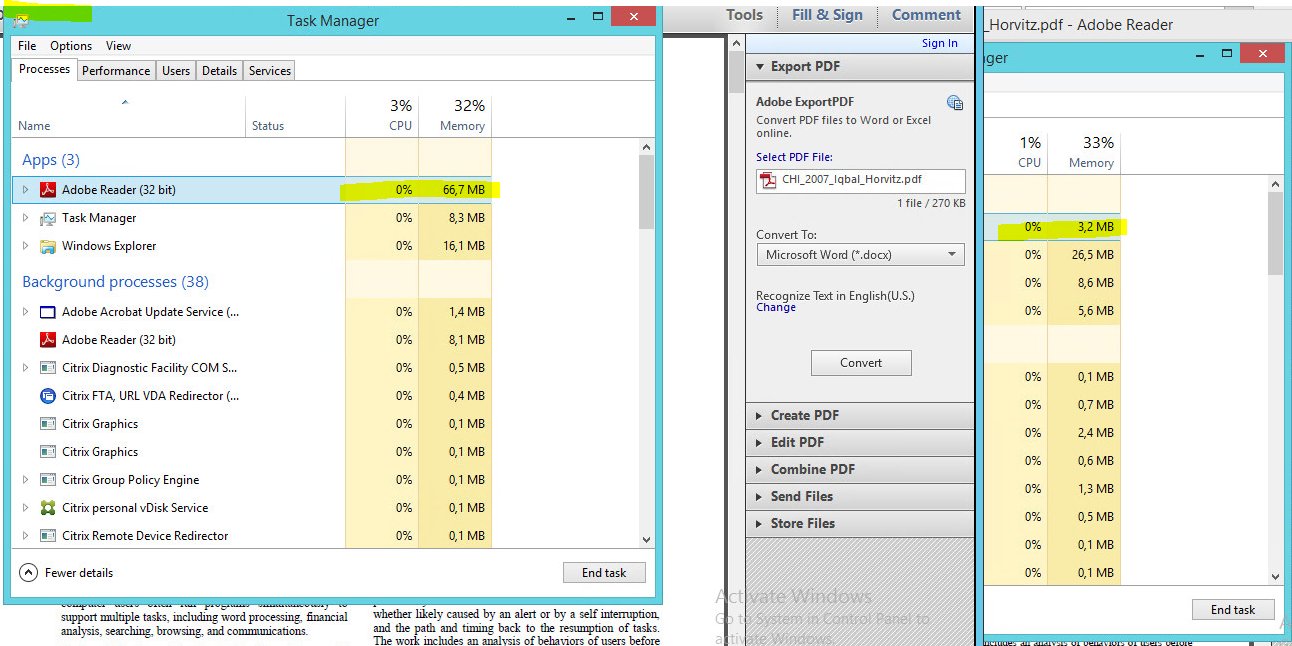
This screenshot shows the difference between optimized memory and non-optimized memory usage. On this two sessions there is one user opening the same PDF document, and after the idle walue kicks inn the memory usage goes down
66 MB vs 3,2 MB memory usage for PDF
We also have other settings which are of a global applied. We can configure, rules to hide the common UI elements, like My computer and so on. Remember also that by default it excludes Administrators from being processed so do not test with administratior accounts unless you remove that value.

From here we can also specify settings for Microsoft USV, Citrix UPM and VMware Persona settings, note that this is for certain versions of these features. The documentation from Citrix is of now quite lacking on that part. The only reference in the PDF documentation states
“Please note that some options only work with specific versions of UPM; please consult the
relevant Citrix documentation for detailed instructions.”
From a client perspective there is an taskbar icon which the end-user can interact with the update settings and send feedback from. So for instance applications which are published to an user will end up here and they can start applications directly from here.

There are also other options like Capture screen which will allow end-users to take a screenshot directly and send it to support

The end-users can self-refresh settings which have been applied to the desktop. Or the administration can force update from within the console directly after adding printers / folder or something like that.