
With Service Pack 1 of Configuration Manager it allows you to create a distribution point in Windows Azure, in case you lack the hardware needed to meet the needs or because of security, limitations that you would want all your clients to download content from the internet rather from your infrastructure.
Now this type of distribution point has its limitations.
* It cannot be used as a PXE point
* It does not allow applications to run directly from the DP
* It does not allow for streamed applications (via App-V) to be run from the DP
* cannot be configured as a pull distribution point
And benefits:
Content that is sent to the cloud-based distribution point is encrypted by Configuration Manager before sending to Windows Azure.
In Windows Azure, you can manually scale the cloud service to meet changing demands for content request by clients, without the requirement to install and provision additional distribution points.
The cloud-based distribution point supports the download of content by clients that are configured for Windows BranchCache.
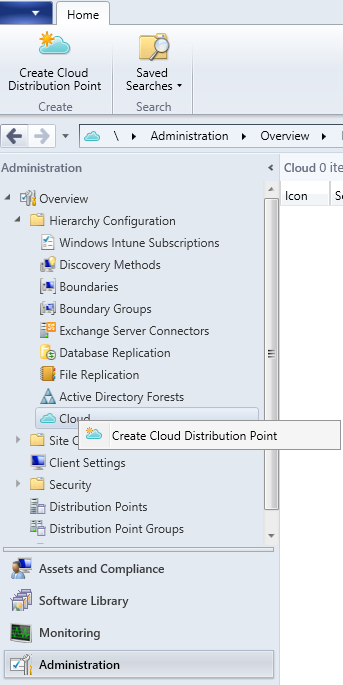
So what do we need to get in place before we can create a DP?
* Subscription to Azure
* Management Certificate (look at my previous post) à https://msandbu.wordpress.com/2013/01/09/managing-windows-azure-via-windows-powershell/
* A service certificate (PKI) that Configuration Manager clients use to connect to cloud-based distribution points.
* You have to configure the agent settings for Cloud Services to allow users / devices to access the cloud DP
* Clients must be able to resolve the name of the cloud service, (In this case a CNAME in our DNS namespace )
After you have created the certifiate and uploaded it into Azure you have to install the DP in ConfigMgr
And from there you have to enter the Subscription ID and the Management Certificate that was uploaded to Azure in the my previous post regarding Azure Management.

And here we enter the Service Name (What region the DP should be located in and which Primary Site it should be accociated with)
And here we also need to upload the Certificate file that we created for our server.
NOTE from technet:
The Service FQDN box is automatically populated from the certificate Subject Name and in most cases, you do not have to edit it. The exception is if you are using a wildcard certificate in a testing environment, where the host name is not specified so that multiple computers that have the same DNS suffix can use the certificate. In this scenario, the certificate Subject contains a value similar to CN=*.contoso.com and Configuration Manager displays a message that you must specify the correct FQDN. Click OK to close the message, and then enter a specific name before the DNS suffix to provide a complete FQDN. For example, you might add clouddp1 to specify the complete service FQDN of clouddp1.contoso.com.
Wildcard certificates are supported for testing environments only.
Click next then alter the alert setup,
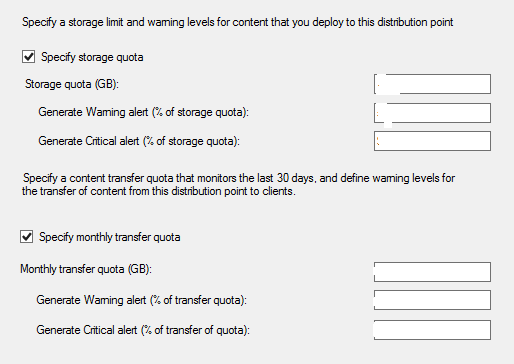
You would want to specify a quota so you don’t get a sky-high bill from Azure.
After that click finish! And you are done.
It might take up to 30 min before the DP appears in Azure.
But if you look under Cloud pane in ConfigMgr you can see status ready

After this is done you also need to create a DNS record in your zone so your users can find the DP, now in order to do so you have to go into the Azure Portal and find the complete URL for the Cloud Service.
Add a CNAME record in your DNS that matches the FQDN of the certificate that you created and that points to the IP in Azure.
You can also read more about this neat new function here à
http://blogs.technet.com/b/configmgrteam/archive/2013/01/31/new-distribution-points-in-configuration-manager-sp1.aspx