In many cases you would need to establish a site-2-site VPN connection between different subscribtions in Microsoft Azure, now this is a pretty simple process in Azure and can be easily done using the management portal.
Example: We have 2 vNETs configured in Microft Azure within the same region (Note that this does not consume bandwith cost, only gateway hours)
vNets:
vNEt 1 (Test1) IP adsress subnet space 10.0.0.0/24 and with a Gateway address of 23.100.60.100
vNet 2 (Test 2) IP address subnet space 10.10.0.0/24 and with a Gateway address of 23.100.70.100
In order to setup a Site-to-site VPN connection I just need to define both of these as local networks as well to each other.
Local Networks:
Local vNet 1(Test1) IP address subnet space 10.0.0.0/24 and with a Gateway address of 23.100.60.100
Local vNet 2(Test2) IP address subnet space 10.10.0.0/24 and with a Gateway addres of 23.100.70.100
So in the management portal I can just define them as local networks to each other
vNet 2 –> Local vNet 1
vNet 1 –> Local vNet 2
and from there just add a same shared key and allow them to connect.
What if we want a third vNet to integrate with one of the other vNets using a Site-to-Site VPN? Is it possible ? Sure it is. With Microosft Azure it is possible to create up to 10 different VPN tunnels, problem is that the management portal only allows for one VPN tunnel at the time for one vNet. So we need to use PowerShell and a custom network xml file in order to finish the configuration here.
We need to create a new virtual entwork called vNet 3 (Test 3) IP address subnet space 10.20.0.0/24 and with a Gateway address of 100.100.20.100 (This also has to be created as a local network site as well in order to bind it up to another vNet.
In this examples we will bind vNet 3 to vNet 1, which already has an VPN tunnel activated for vNet 2.
First we need to download the vNet configuration XML, which can be done using the command
get-azurevnetconfig –exporttofile c:foldername.xml
Open it up and locate the virtualnetwork site for vNet1
<VirtualNetworkSites>
<VirtualNetworkSite name=”test” Location=”North Europe”>
<AddressSpace>
<AddressPrefix>10.0.0.0/24</AddressPrefix>
</AddressSpace>
<Subnets>
<Subnet name=”Subnet-1″>
<AddressPrefix>10.0.0.0/27</AddressPrefix>
</Subnet>
<Subnet name=”GatewaySubnet”>
<AddressPrefix>10.0.0.32/29</AddressPrefix>
</Subnet>
</Subnets>
<DnsServersRef>
<DnsServerRef name=”10.0.0.100″ />
</DnsServersRef>
<Gateway>
<ConnectionsToLocalNetwork>
<LocalNetworkSiteRef name=”test2″>
<Connection type=”IPsec” />
</LocalNetworkSiteRef>
<LocalNetworkSiteRef name=”test3″>
<Connection type=”IPsec” />
</LocalNetworkSiteRef>
</ConnectionsToLocalNetwork>
</Gateway>
Here is where we need to define our local network we which this vNet to connect to. For vNet 3 which does not have any VPN connection set up we can do this via the managmenet portal. or add a
<LocalNetworkSiteRef name=”test1″>
<Connection type=”IPsec” />
</LocalNetworkSiteRef>
In the vnet xml file. After we are done adding the connection path to vNet we need to import the XML file to our azure subscribtion.
This can be done using the set-azurevnetconfig –configurationpath c:folderfile.xml
After this is done we need to change the sharedkey so that the vNets have the same key.
Set-AzureVnetGatewayKey –VnetName test1 –Localnetworksitename test3 –SharedKey 12345QWERT
Set-AzureVnetGatewayKey –VnetName test3 –Localnetworksitename test1 –SharedKey 12345QWERT
After this is done the connections should be established. Note that if they don’t you need to go into the management portal, into vNet 3 and choose connect.
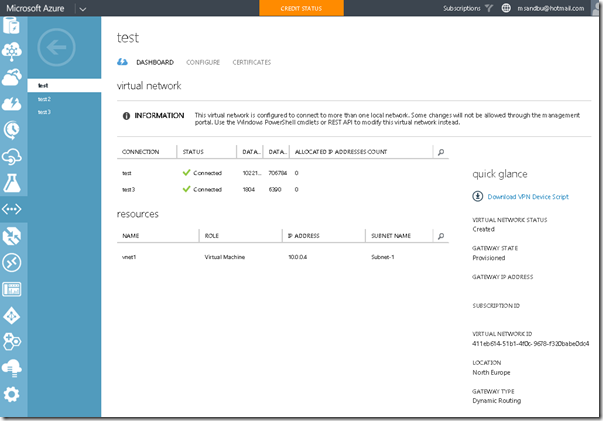
Then you can go into vNet 1 and see the connection is setup against two vNets.


