So a couple of days ago, Microsoft announced the preview for site recovery for physical and Vmware servers. Luckily enough I was able to get access to the preview pretty early. Now for those who don’t know the site recovery feature is built upon the InMage Scout suite that Microsoft purchased a while back. About 6 months back, Microsoft annouced the Migration Accelerator suite which was the first Microsoft branding of InMage but now they have built it into the Microsoft Azure portal, but the architecture is still the same. So this blog will explain how the the different components operate and how it works and how to set it up.

Now there are three different components for a on-premise to Azure replication of virtual machines. There is the
* Configuration Server (Which is this case is Azure VM which is used for centralized management)
* Master Target (User as a repository and for retention, recives the replicated data)
* Process Server (This is the on-premise server which actually does the data moving. It caches data, compresses and encrypts it using a passphrase we create and moves the data to the master target which in turn moves it to Azure.
Now when connecting this to a on-premise site the Process Server will push install the InMage agent on every virtual machines that it want to protect. The InMage agent will then do a VSS snapshot and move the data to the Process Server which will in turn replicate the data to the master target.
So when you get access to the preview, create a new site recovery vault
In the dashboard you now have the option to choose between On-premise site with Vmware and Physical computer to Azure
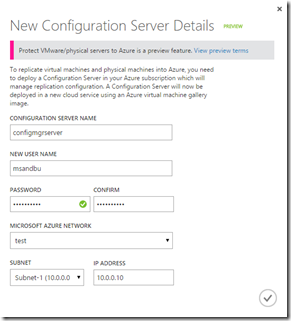
First we have to deploy the configuration server which the managment plane in Azure. So if we click Deploy Configuration Server this wizard will appear which has a custom image which is uses to deploy a Configuration Server
This will automatically create an A3 instance, running a custom image (note it might take some time before in appers in the virtual machine pane in Azure) You can look in the jobs pane of the recovery vault what the status is
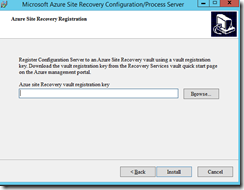
When it is done you can go into the virtual machine pane and connect to the Configuration Manager server using RDP. When in the virtual machine run the setup which is located on the desktop
When setting up the Confguration Manager component it requires the vault registration key (Which is downloadable from the Site Recovery dashboard)
Note when the configuration manager server component is finished innstalling it wil present you with a passphrase. COPY IT!! Since you will use it to connect the other components.
Now when this is done the server should appear in the Site Recovery under servers as a configuration manager server
Next we need to deploy a master target server. This will also deploy in Azure (and will be a A4 machine with a lot of disk capaticy
(The virtual machine will have an R: drive where it stores retention data) it is about 1TB large.
The same goes here, it will generate a virtual machine which will eventually appear in the virtual machine pane in Azure, when it is done connect to it using RDP, it will start a presetup which will generate a certificate which allows for the Process serer to connect to it using HTTPS
Then when running the wizard it will ask for the IP-address (internal on the same vNet) for the configuration manager server and the passphrase. In my case I had the configuration manager server on 10.0.0.10 and the master server on 10.0.0.15. After the master server is finished deployed take note of the VIP and the endpoints which are attached to it.
Now that we are done with the Azure parts of it we need to install a process server. Download the bits from the azure dashboard and install it on a Windows Server (which has access to vCenter)
Enter the VIP of the Cloud service and don’t change the port. Also we need to enter the passphrase which was generated on the Configuration Manager server.
Now after the installastion is complete it will ask you to download the Vmware CLI binares from Vmware
Now this is for 5.1 (but I tested it against a vSphere 5.5 vcenter and it worked fine) the only pieces it uses the CLI binaries for are to discover virtual machines on vCenter. Rest of the job is using agents on the virtual machines.
Now that we are done with the seperate components they should appear in the Azure portal. Go into the recovery vault, servers –> Configuration manager server and click on it and properties.
Now we should see that the different servers are working. 
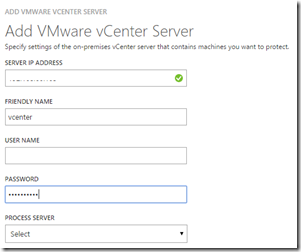
Next we need to add a vCenter server from the server dashboard.
Add the credentials and IP-adress and choose what Process Server is to be used to connect to the on-premise vCenter server.
After that is done and the vCenter appears under servers and connected you can create a protection group (and then we add virtual machines to it)
Specify the thresholds and retention time for the virtual machines that are going to be in the protection group.
Next we we need to add virtual machines to the group
Then choose from vCenter what virtual machines to want to protect
Then you need to specify which resources are going to be used to repllicate the target VM to Azure
And of course administrator credentials to remote push the InMage mobility agent to the VM
After that the replication will begin
And you can see that on the virtual machine that the InMage agent is being installed.
And note that the replication might take some time depending on the type of bandwidth available.


