This is going to be a long one ![]()
Always wanted to document this myself but never had the time, so I figured why not knock two birds with one stone and blog it as well since many are probably wondering about the same thing.
This is a typical deployment for many right? You have your internal XA/XD which are tied to a StoreFront web server and for remote access you have Netscaler Gateway/AG
And depending on the setup you might have a Netscaler in DMZ behind a NAT firewall, or directly connected to the internet from the DMZ or you might have a double hop network where you have multiple DMZ sones and firewalls.
So how to tie them together ?
First I suggest you read my previous post regarding XenDesktop 7 with StoreFront and Appcontroller deployment.
https://msandbu.wordpress.com/2013/06/26/xendesktop-7-setup-and-appcontroller-setup/
Lets head over to our Netscaler deployment. We can start by cheching our network connection.
We have different types of networking within the NS, we have VIP( Virtual IP) which are typically tied to load balanced service. We have SNIP (Subnet IP) which are used to initiate a connection to the back-end servers (XenDesktop Servers, Storefront etc) and you have a NSIP (Netscaler IP which is used for management)
So for a user the connection will look like this.
User –> VIP –> SNIP –> XenDesktop (Servers)
Typical deployment is that you have a netscaler with two interfaces, one in to the DMZ and one into the backend servers. (In my case I have all interfaces connected to the same subnet.
Next we can add authentication.
Go into Netscaler Gateway –> Policies –> Authentication –> LDAP –> Add
For named expression I choose General and True and choose Add.
((What does this do ? specifies that IF the traffic is going trough the NS appliance then this policy should be applied)
Then give it a name and choose new server and enter the information to the AD server. After you have entered the info “Press Retrieve Attributes”
Remember that this command uses the IP address of the server you are using the browser on.
If you are having trouble with authentication fire up console to the Netscaler Appliance type in shell then cd /tmp then type the command cat aaad.debug
This will display in real time information regarding the authentication tries.
After that is done, add a DNS server.
Now lets add a certificate (for this purpose I have a Enterprise Root CA on Windows Server 2012 which I used to create a web server certificate which contained the host name of the access gateway) nsgw.msandbu.local in my case and I choose to export it as a PFX file including the private key (You will need the private key!!) In production you should use a third party CA to isse a certificate to you.
You can upload the PFX file under Traffic Management –> SSL –> Manage Certificates –> then you can upload the PFX.
After this is done open Netscaler console and extract the certificate and the key from the PFX.
This can be done by running openssl from the Netscaler Console
openssl.exe pkcs12 -in publicAndprivate.pfx -nocerts -out privateKey.pem (Extract keys)
openssl.exe pkcs12 -in publicAndprivate.pfx -clcerts -nokeys -out publicCert.pem (Extract Certs)
After that is done you can install the certificate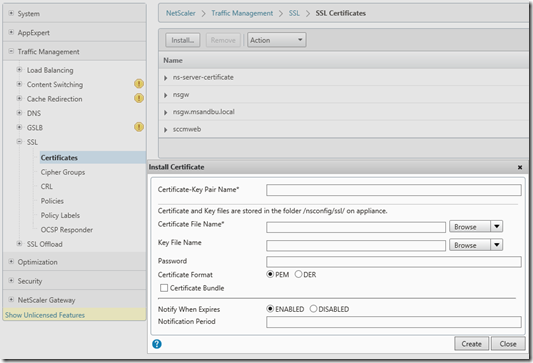
Next we create a virtual server under Netscaler Gateway and assosiate it with an IP-address.
Since we just want ICA-proxy and no VPN (Smart Access solution) we can choose Basic Mode.
Under Protocol choose SSL (After this is done the service will go down unless you have a valid ceritificate installed)
If you go into the Authentication Tab (mark the Enable Authentication)
and under Primary Authentication Policiess choose insert policy. (By default the one we created earlier will appear)
Now if you wish to have two-factor authentication you can add another Primary authentication policy.
After this is done head over to policies. We need to add a Session Policy, here as well we use ns_true as an expression. Give it a name and press create New Request Profile.
Here we enter the information about the backend storefront servers. (NOTE I already have one stored there this is because I have created this earlier ![]()
Now there are a couple of options here we need to define.
First under Published Applications.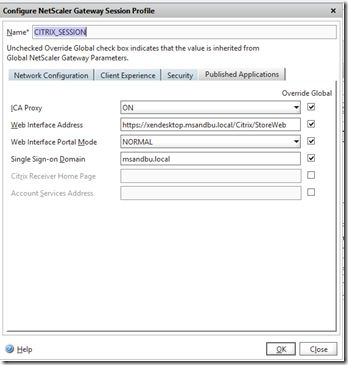
1: We have to define ICA-proxy, this will tunnel ICA traffic via port 443 back to the user.
2: Web Interface address this has to be Storefront web address.
3: Single sign-on domain should be your local AD domain. (Don’t enter anything here in case you have multiple domains)
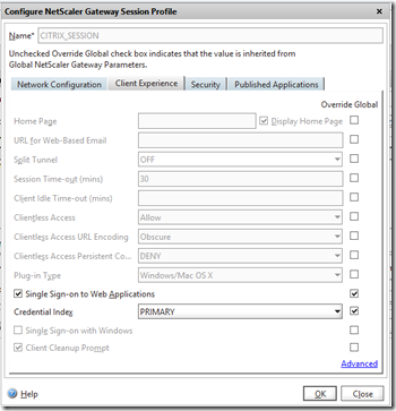
Next is under Client Experience –>
Define Single Sign-ON to web applications using Primary Credentials, this allows the Netscaler gateway to authenticate to the Storefront site.
We have to define at the NS should use SSO to the storefront web adress using the Primary authentication mechanism which is AD in my case.
Last but not least, Security so we can allow users to actually enter.
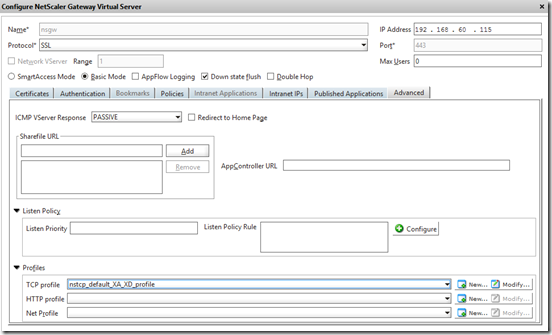
You should also enable TCP profile for this virtual server set to nstcp_default_xa_xd_profile (This profile works best for internal usage and high bandwidth networks)
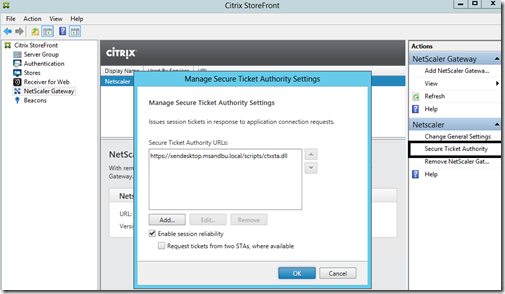
Then we also have to add STA (Of the XD controllers in my case) Go back to Published Applications.
Click Add and enter the URL of the XD controller. After you save and refresh the page it will show up like mine did now.
Remember to save the config! ![]()
After that is done we have head over to Storefront
Now there are a couple of things we need to fix there. First we need to add an authentication option from Netscaler.
This will allow the Storefront to authenticate users coming from Netscaler. (To pass the credentials forward)
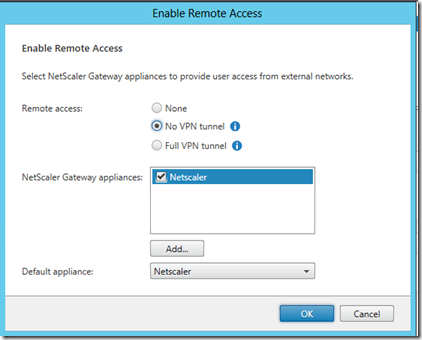
Next we have to go to Stores –> Enable Remote Access –> Choose Add netscaler appliance –>
Here enter the info regarding your netscaler.
SNIP here is the one that you entered inn earlier on the Netscaler, StoreFront uses this to validate that any incoming connections comes from a trusted host.
The CallBack URL is the Internal IP-address of the Netscaler.
Then you setup it as a NO VPN Tunnel and choose the Gateway appliance to use.
You also have to add the STA’s here as well.
And last but not least, Beacons.
Beacons are used to identify if the end-user comes from an internal or external connection.
For instance you can put an external beacon for a public accessable website and internal for a website that is ONLY available for internal users.
This is what decides if the ICA-file the end-user receives is going to be used via ICA-proxy or a plain ICA-connection straight to the server.
In this case since it’s a demo enviroment all are on the same network. But I could remove the nsgw as an external beacon. And just have www.citrix.com and another external site.
Now since the AppController connected to the Storefront service we don’t need to anything else inorder to view Apps deployed from AppController.
NOTE: There is a couple of things if you are doing to deploy for instnace WorX apps from appcontroller and going to use mVPN solution to iOS and Andriod.
You will need to enable a couple of things here.
* Split-tunneling
* Clientless Access URL Encoding = Clear
You also need to enable Secure Browsing

After this is done, we can open up our virtual IP URL.
In my case it is https://nsgw.msandbu.local
Login with my username and password and start a desktop connection (For the purpose of this demonstration I have also added a weblink from AppController that points to yammer.com
If you open resource monitor you can see that traffic is tunneled in port 443![]()
And if we open resource monitor on the desktop I just launched I can see that the servers speaks via the session reliability port to the SNIP ip (Which is 60.114)![]()





![image_thumb[9] image_thumb[9]](http://msandbu.files.wordpress.com/2013/08/image_thumb9_thumb.png?resize=526%2C285)
![image_thumb[1] image_thumb[1]](http://msandbu.files.wordpress.com/2013/08/image_thumb1_thumb.png?resize=495%2C299)
This seems to be AppController 2.6? AppController 2.8 is supposed to be deployed infron of StoreFront.
Yeah good catch! it is 2.6 (Since it states cloud gateway and not xenmobile) and you are right regarding the deployment scenario for instance Worx applications requires that the Appcontroller is infront…. But! it some scenarios the Storefront server should be placed in front. This is the recommended way to configure deployment so that HTML 5 and App subscriptions will work properly.
Pingback: 1Y0-300 Citrix Exam Resource Guide Part Two