
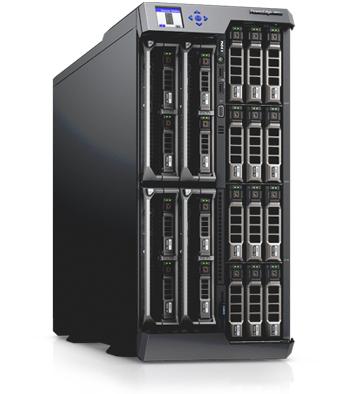
Dell introduced their new VRTX platform last year. For those who haven’t heard about VRTX it it was the start of fully-converged hardware solutions from Dell. Its a nifty piece of hardware which allows for up to 4 nodes and 25 harddrives to share midplane allowing for simultaions access to the storage.
It is also possible to put some PCI-E cards in there as well
- 8 flexible PCIe slots:
- 3 full-height/full-length slots (150W) with double-wide card support (225W)
- 5 low-profile/half-length slots (25W)
All within the same tower, making it an ideal solution with for remote sites/offices with need for a small powerhouse.
The VRTX comes with a custom made disk management solution, which operates differently unlike the other Dell software. So for instance if we need to create an Hyper-V cluster we would need to have shared storage in place, the disk setup is configured from the CMC.

(NOTE After we have configured the disks, it will not appear in the iDrac of the indivudual nodes, this is by design, but it will appear when setting up the OS)
first you need to go into Storage –> Virtual disks
(NOTE: make sure you have updated the PERC before creating the virtual disks!)

Create Virtual disks –> From here you need to select the number of disks you want to add to the virtual drive

Important to note here, In my case I want to create a RAID 10 set with one hot spare (Since RAID 10 has the best read-performance of the differnet raid levels not very dependant on a good controller). Ref https://publib.boulder.ibm.com/infocenter/eserver/v1r2/index.jsp?topic=%2Fdiricinfo%2Ffqy0_cselraid.html
First I create the RAID 10 set and define my storage policies. Important to note that if you have a newer Dell VRTX with dual PERC you do not have the ability to do a write cache and you will not get the performance you want.
After you are done choose disks and policies choose Create Virtual disk. When the operations is complete you can go to manage and choose assign hot spare

Next we have to do the mapping, go back to the Storage pane. From here we need to assign it to multiple assigment

It is important to note that a virtual disk can only assigned to a virtual adapter, and a virtual adapter can only be asigned to ONE server. From here you can see that my server slot mappings are by default assigned a virtual adapter.
Now go back to the Virtual disks pane and choose Assign, from here we can assign the virtual disk to a virtual adapter. Here we choose full access.

Then choose Apply. Now when going back to the storage pane you can see the overview of the storage layout
