
As part of Azure Arc, Microsoft provides integration with Kubernetes to provide a couple of features.
- Connect Kubernetes running outside of Azure for inventory, grouping, and tagging.
- Deploy applications and apply configuration using GitOps-based configuration management.
- View and monitor your clusters using Azure Monitor for containers.
- Enforce threat protection using Azure Defender for Kubernetes.
- Apply policies using Azure Policy for Kubernetes.
In this blog post, I want to highlight how to set up an Azure Arc integrated Kubernetes Cluster and configure Azure Defender and Azure Monitor (which is a requirement if you want full threat detection for Azure Arc)
1: Connect an existing Kubernetes deployment to Azure Arc
Azure Arc for Kubernetes requires that you have an existing Kubernetes environment running (can be Rancher, Openshift or vanilla) deployment. It does technically work with another setups such as GKE and EKS but not officially supported. To do the integration you need to have a couple of things in place.
- A
kubeconfigfile and context pointing to your cluster. - ‘Read’ and ‘Write’ permissions on the Azure Arc enabled Kubernetes resource type (
Microsoft.Kubernetes/connectedClusters). - Install the latest release of Helm 3.
- Install or upgrade Azure CLI to version >= 2.16.0
- Install the
connectedk8sAzure CLI extension of version >= 1.0.0:
Then run the commands
az extension add --name connectedk8s
az extension add --name k8s-extension
You need both extensions to be able to setup Azure Arc and to configure Azure Defender one step later.
Then you need to configure the resource provider for Azure Arc enabled Kubernetes
az provider register --namespace Microsoft.Kubernetes
az provider register --namespace Microsoft.KubernetesConfiguration
az provider register --namespace Microsoft.ExtendedLocation
Next create a resource group which will contain the Azure Arc enabled resource.
az group create --name AzureArcTest -l NorwayEast -o table
Lastly connect the Kubernetes cluster to the Azure Arc Resource
az connectedk8s connect --name AzureArcTest1 --resource-group AzureArcTest
NOTE: There are some flags that you can use together with the az connectedk8s command that you can use to define what kind of infrastructure the Cluster is running on using flags such as
–infrastructure “azure, gcp, vsphere” and also –distribution “aks, eks, gke” which are used as metadata tags in Azure, but is not required.
You can verify the connection by using the command
az connectedk8s list -g AzureArcTest -o table
or viewing in the portal under Kubernetes Services in Azure.

Now as part of the connection, Azure Arc will create its own namespace where it will place all the pods containing the services it uses to communicate with the cluster. Which you can view by using the command
kubectl -n azure-arc get deployments,pods

2: Configure Azure Defender for Kubernetes Cluster
Once the Kubernetes cluster is Azure Arc enabled, we can enable Azure Defender. I have previously written about Security Center/Defender which is called now (Azure Security Center Overview and Security Ecosystem | Marius Sandbu (msandbu.org)) but it provides threat detection against the Kubernetes environment. It should be noted that it does this on two layers.
1: For the Kubernetes Cluster (Provides detection mechanisms at the cluster level)
2: For the Kubernetes Worker Nodes (Provider detection mechanisms at the worker level)
As some examples, the first layer can detect, for instance, Exposed Kubeflow dashboard detected while at the worker node level it can detect Privileged command run in a container.
To onboarding Azure Defender for Kubernetes you need to do a couple of things first. First you need to enable Azure Defender for Kubernetes, which is not available using the Azure CLI, you can either enable it using the Portal or for instance Terraform
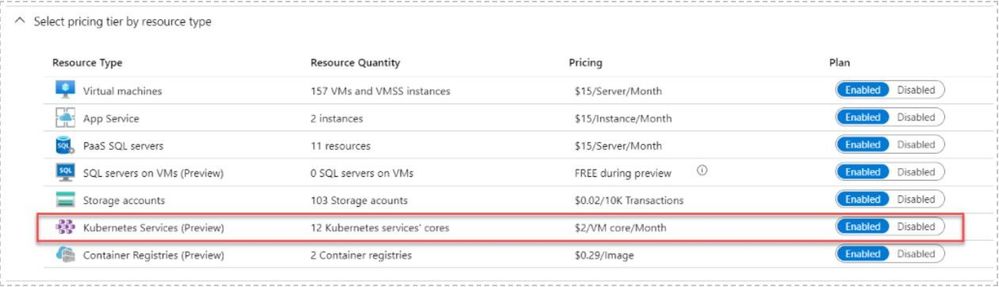
resource "azurerm_security_center_subscription_pricing" "example" {
  tier          = "Standard"
  resource_type = "Kubernetes"
}
Next you need to install the extension to the Kubernetes Cluster (this requires that you have kubectl access to the existing cluster when running the command)
az k8s-extension create --name microsoft.azuredefender.kubernetes --cluster-type connectedClusters --cluster-name <cluster-name> --resource-group <resource-group> --extension-type microsoft.azuredefender.kubernetes
This will create a new namespace within the Kubernetes cluster which will contain the extension using an API extension. You can trigger a test alert by running the command
kubectl get pods --namespace=asc-alerttest-662jfi039n
This command will fail with “No resource found” but after a while, you should get an alert in Security Center, which you can view using the command
az security alert list -g "nameofresourcegroup"

Or you can view it in the portal.

3: Configure Azure Monitor for Kubernetes Cluster
Now as it is now, it will only highlight Security alerts that are related to the Kubernetes Cluster, so to provide insight to the worker nodes we also need to install the Azure monitor agent as well. This can be done using the commands
az k8s-extension create --name azuremonitor-containers --cluster-name <cluster-name> --resource-group <resource-group> --cluster-type connectedClusters --extension-type Microsoft.AzureMonitor.Containers
With this, it will deploy a pod per host using a daemon set to collect data from the local worker node.

Now by default enabling Azure Monitor for an existing cluster, it will use a default log analytics workspace to store data. The type of information the agent will be collected is listed here –> Container Monitoring solution in Azure Monitor – Azure Monitor | Microsoft Docs
But in summary, it is.
- ContainerInventory
- ContainerImageInventory
- ContainerLog
- ContainerServiceLog
- ContainerNodeInventory_CL
- KubePodInventory_CL
- ContainerProcess_CL
- KubeEvents_CL
It will also provide Container Insight which collects a lot of telemetry data from the different worker nodes.

4: Verify and reference for security alerts
Once all these components are up and running, you can also configure custom alerts and you can also view the reference table for all security alerts in Azure defender in the URL below –> Reference table for all security alerts in Azure Security Center | Microsoft Docs
But here is an example of a Security Center alert

Nice guide! Did you manage it to work on NorwayEast? The connected cluster resource does not seem to be supported when I try.
Det er i preview for Norge (så derfor jeg kunne gjøre det når jeg skrev oppskriften) kommer snart.