Todays generation of IT-users are embracing BYOD as much as possible, where one user has multiple devices to work with. This isn’t so easy to achive with a corporate laptop.
Imagine a new employee comes on board and is given a new corporate laptop. This new employee demands flexibility and the ability to personilize the laptop, not quite easy when the laptop is installed with a corporate image and contains different security settings to contain the integrity of the laptop.
So you get a not so happy user. The solution ?
XenClient!
XenClient is a type 1 hypervisor (Like XenServer and Hyper-V) but it is used on client computers not on servers. Where the main idea is to have different virtual machines running on a laptop (for instance having 1 VM which the user can use at home his personal VM) and then having a corpoprate VM which he uses at work)
This way the user gets the BYOD he/she wants.
Remember that XenClient has an HCL which you should look on before you deploy this product
http://citrix.com/ready/en/search?search%5Bq%5D=Xenclient
The architecture and deployment of this solution is pretty simple and this is what I want do show.
The Architecture consists of a Managment Server and a Synchronizer server (Which must be installed on top of a hypervisor 2008R2 or 2012 With Project Thunder beta release)
The Synchronizer is the one responsible for deploying and maintaining the VDI images.
For the purpose of this demo I deployed Project Thunder (Which supports Hyper-V 2012 server) and deployed XenClient on top of VMware player.
You can download this from mycitrix (requires login)
After installation and opening you need to configure the network switch
Check the other settings as well and make sure that the UNC path for VMs are correct.
Now in my case im going to create a VM running on Server 2012 which I want to deploy to my users, doesn’t make a lot of sense but that’s the only ISO I had stored here ![]()
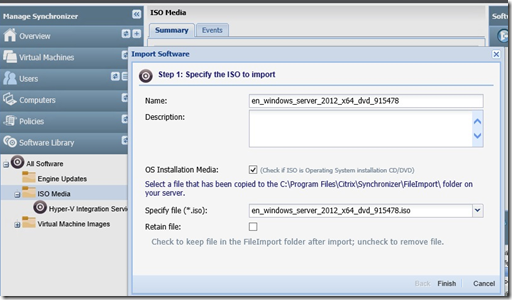
If you want to import ISO files into XenClient you have to place them in this folder
Then go into Software Library –> ISO Media and import the file.
Next we go into Virtual Machines and choose create new and add the ISO file and enter the paramteres
Next I choose the usage mode.
Since this is going to be my personal VM and I don’t image updates Im going with Custom.
In many cases I would use PVD with the corporate image since then I can have one Image that I need to update.
Next I define which hardware this VM should have.
Next I define policies for this VM, for instnace backup schedule, allow USB devices etc.
Then XenClient will start the VM on Hyper-V
Then I can finish customization and then I can deploy it to my users.
Then it runs the deployment job
Then you can see that the VM is deployed
Then I now have a VM and a local user which I will use to connect to the Synchronizer server.
(Something I found a bit odd was that I had a self-signed certificate on the server but the client connected anyways)
Then I have to enter information to connect to the Sync-server
Now as an IT-admin I could setup this for another user and download his VM but in my case I have my own windows server vm I wish to user to I enter my own user ![]()
Now XenClient will start to download the VM which is deployed to my user
I can now see in the XenClient management console that my computer is connected to the server.
Now if someone steals the laptop I can choose kill it in the XenClient console, the Client refreshes and all I see is this screen. And remember that you should setup a policy that defines that your clients need to contant the sync-server for instance once a week.
Now remember that XenClient is a part of XenDesktop Enterprise or Platinum so when you buy XenDesktop you get this as well.
Someone I suggest Citrix does, is to “integrate” XenDesktop with XenClient. For instance if I have my VM running on XenDesktop and I wish to sync it to my XenClient laptop as well for working on the road, this is something they should work on ![]()


Pingback: How easy is it deploying XenClient ? Quick walkthrough | Conde Malagueta