
Windows Azure is now in a preview phase with its IaaS solution, which allows you to create and have your own virtual machines in Windows Azure.
Which allows you now to have the whole specter of As-a-service solution in Windows Azure.
IaaS means that you are responsible for the virtual machines; Microsoft will handle the rest of the physical layers (Which includes Networking. Storage, Hardware, Hypervisor) 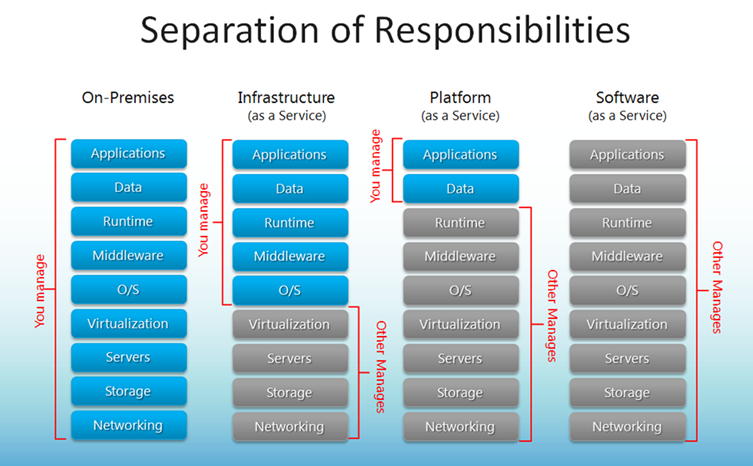
If you look to the left side On-premise (Which is a private cloud setup) you would manage the entire specter, but in this case with Azure we can only manage the blue parts (IaaS)
But back to the point of this post, right now you have the option to manage your Azure setup either with the web-portal or if you have setup System Center or you can use PowerShell.
Microsoft has created a good portion of cmdlets available to use against Azure this allows for more tasks to be automated.
In order to setup PowerShell against Azure a couple of components are needed.
1: Download the PowerShell Azure cmdlets module
you can download them from this Link à
http://go.microsoft.com/?linkid=9811175&clcid=0x409
or for other OS à http://www.windowsazure.com/en-us/manage/downloads/

After it is installed you have the set the execution policy in PowerShell to remotesigned
You have to open PowerShell as administrator before running this command à
Set-executionpolicy RemoteSigned
Now we can import the Azure module in PowerShell.
Import-Module “C:Program Files (x86)Microsoft SDKsWindows AzurePowerShellAzureAzure.psd1”

But before we continue we have to upload an management certificate to the management portal.
we need to create a self-signed certificate on the local computer which we are going to upload to the management portal (This allows for authentication with Azure )
to create this we need to makecert tool which is a part of the visual studio application.
We run this command in order to create the certificate
makecert -sky exchange -r -n “CN=<CertificateName>” -pe -a sha1 -len 2048 -ss My “<CertificateName>.cer”

This certificate will store itself in the local user | personal store of certificate on the computer

Right click this and choose export à and choose a folder to store it in.
After this open the Azure management portal and go to settings à Management Certificates à

And from here upload the certificate that you just created.
After it is uploaded it should appear like this

After this is complete, open the PowerShell session again and run the command Get-AzurePublishSettingsFile this will open a browser window to Azure which will get a small configuration file, which contains where your Azure instance is where the PowerShell module needs to connect etc.

Download the file, after that you have to import it into the PowerShell session

After this is done we can start to use PowerShell against Azure if we use the command
get-command –module Azure we will list all the commands available to use against Azure

And for instance we can start and stop VM’s running there à
Will come back with more in a later post.